E-Bike Brake Maintenance: When and How to Service Them
In this comprehensive guide, I’ll cover the fundamentals of e-bike brake systems, explain the signs that indicate when servicing is needed, and provide step-by-step instructions for maintaining different brake types, including disc, hydraulic, and mechanical brakes. I’ll also share routine maintenance tips and troubleshoot some common brake-related issues.
E-Bike Brake Maintenance: When and How to Service Them
Whether you’re a new e-bike owner or an experienced rider, mastering brake maintenance is an essential skill that will keep your electric bike performing at its best for years to come.
Understanding E-Bike Brake Systems
Electric bikes typically use one of three main brake types:
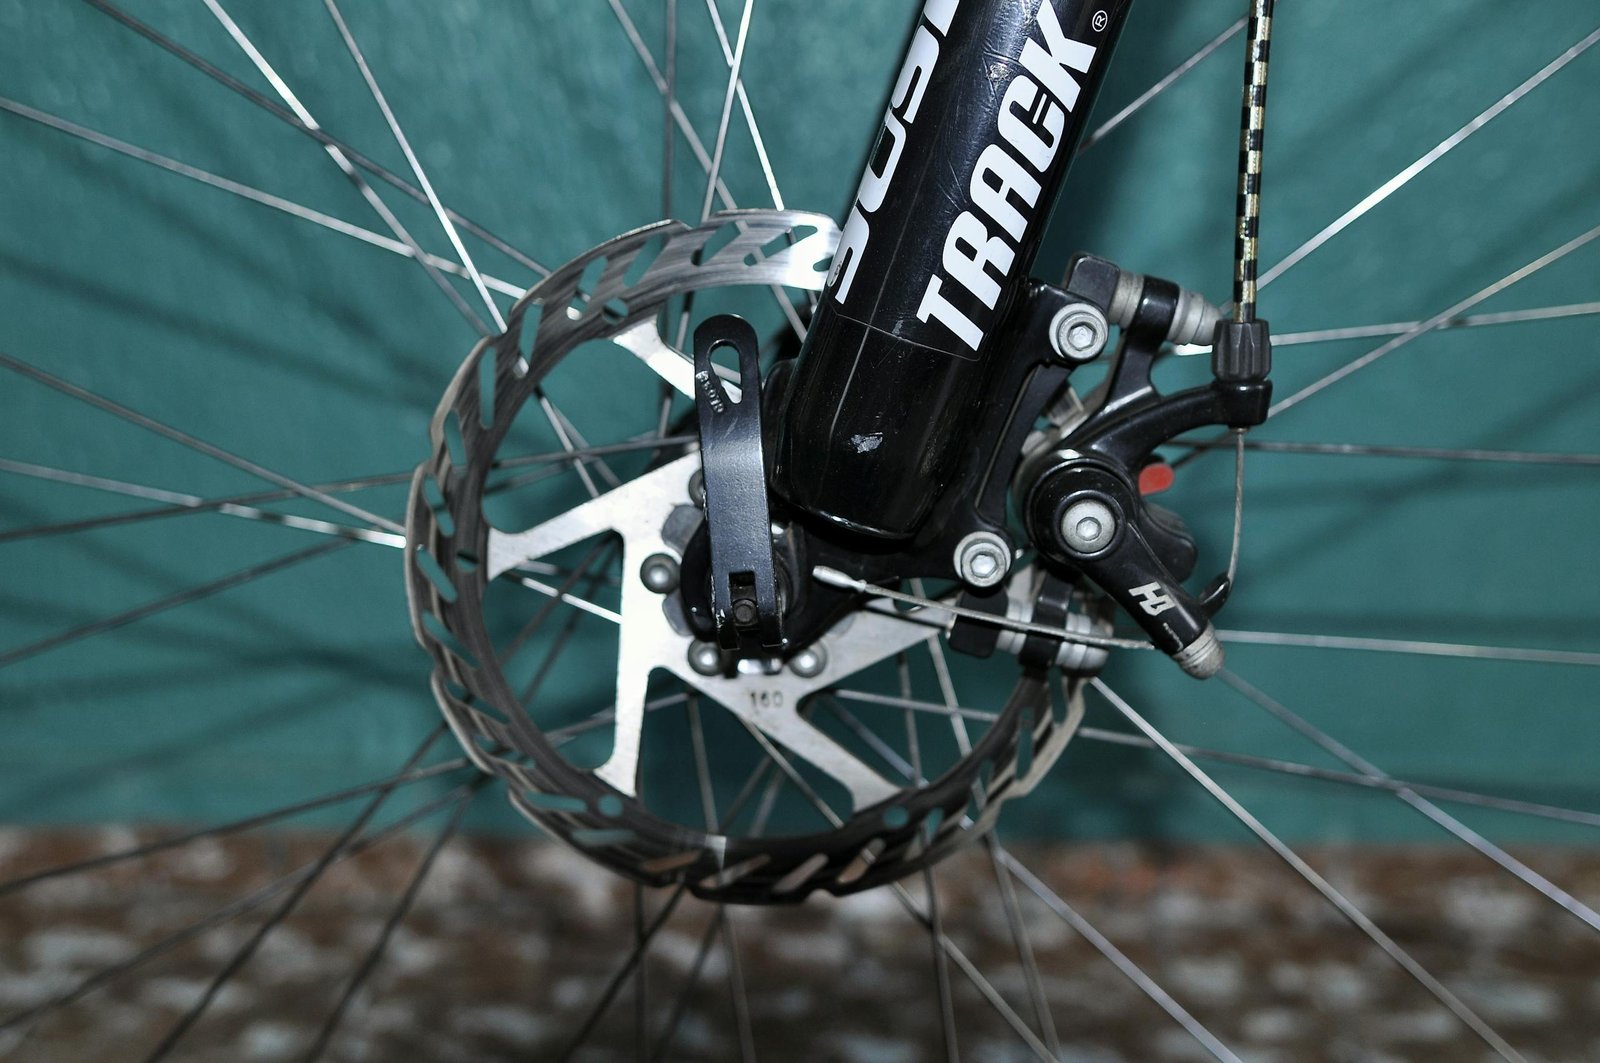
- Disc Brakes: These feature a rotor mounted to the wheel hub and a caliper that clamps down on the rotor to slow the bike. Disc brakes provide excellent stopping power and modulation, making them a popular choice for e-bikes.
- Hydraulic Brakes: Hydraulic brakes use fluid-filled lines to actuate the brake calipers, resulting in a smooth, powerful braking feel. They generally require less maintenance than mechanical brakes.
- Mechanical Brakes: Also known as cable-actuated brakes, these use wire cables to pull the brake pads against the wheel rim. They’re a simpler, more affordable option but may require more frequent adjustment.
Regardless of the brake type, the key components are the brake pads, rotors (or rims), and the actuation mechanism (cable or hydraulic line). Proper maintenance of these parts is essential for ensuring your e-bike’s brakes perform reliably.
Signs That Your E-Bike Brakes Need Servicing
Regularly inspecting your e-bike’s brakes and addressing any issues promptly is crucial for your safety. Here are some common warning signs that indicate it’s time for brake maintenance:
- Reduced Braking Power: If you notice your brakes feeling spongy or requiring more lever travel to achieve the same stopping force, it’s likely time for a brake service.
- Brake Pad Wear: Inspect your brake pads visually and replace them when the material is worn down to the minimum thickness (usually around 2-3mm).
- Rotor or Rim Wear: Look for grooves, cracks, or uneven wear on your brake rotors or rim surfaces. Severely worn components should be replaced.
- Fluid Leaks: For hydraulic brakes, any fluid leakage from the lines or calipers is a clear sign that service or repair is needed.
- Squeaking or Rubbing Noises: Unusual sounds coming from your brakes may indicate misalignment, contamination, or wear.
- Brake Pad Contamination: If your brake pads become glazed, oily, or collect debris, they’ll lose effectiveness and may need cleaning or replacement.
Addressing these issues promptly will help ensure your e-bike’s brakes remain in top condition and provide reliable, safe stopping power.
Servicing Disc Brakes
Disc brakes are a common choice for electric bikes due to their superior braking performance and consistency, even in wet conditions. Here’s how to service disc brake systems:
Tools Needed:
- Brake pad removal tool
- Caliper alignment tool (or small c-clamp)
- Disc brake rotor truing tool (or adjustable wrench)
- Isopropyl alcohol and clean rags
Brake Pad Replacement:
- Locate the brake pads within the caliper and note their orientation.
- Use the brake pad removal tool to gently pry the pads out of the caliper.
- Clean the caliper body and inspect the rotor for any contamination or damage.
- Insert the new pads, ensuring they are installed in the correct orientation.
- Verify that the pads are making full contact with the rotor by slowly squeezing the brake lever.
Rotor Truing:
- Inspect the brake rotor for any warping, scoring, or contamination.
- Secure the rotor truing tool around the rotor and gently bend any high or low spots back into alignment.
- Wipe the rotor with isopropyl alcohol to remove any dirt or oils.
Caliper Alignment:
- Loosen the caliper mounting bolts to allow the caliper to move freely.
- Slowly squeeze the brake lever and observe the caliper’s positioning relative to the rotor.
- Center the caliper over the rotor and tighten the mounting bolts.
- Repeat the process until the caliper is properly aligned.
Bedding-In New Pads:
- Perform several light braking applications to begin the bedding-in process.
- Gradually increase the braking force over the next 15-20 stops.
- Avoid coming to a complete stop during the bedding-in process.
Refer to the manufacturer’s instructions for any model-specific guidance, and consider watching instructional videos to see the process in action.
Servicing Hydraulic Brakes
Hydraulic brakes offer a more seamless, powerful braking experience compared to mechanical systems. Maintaining them does require some specialized knowledge, but the process is relatively straightforward:
Tools Needed:
- Brake bleed kit (includes fluid, syringes, and tubing)
- Torque wrench
- Isopropyl alcohol and clean rags
Brake Pad Replacement:
- Locate the brake pads within the caliper and note their orientation.
- Use the brake pad removal tool to gently pry the pads out of the caliper.
- Clean the caliper body and inspect the rotor for any contamination or damage.
- Insert the new pads, ensuring they are installed in the correct orientation.
- Slowly squeeze the brake lever to bring the pads into contact with the rotor.
Brake Fluid Bleeding:
- Remove the brake fluid reservoir cap and attach the bleed tube to the bleed nipple on the caliper.
- Pump the brake lever several times to draw new fluid into the system.
- Open the bleed nipple and allow the old fluid to drain out while continuing to pump the lever.
- Close the bleed nipple and repeat the process until the fluid flowing out is clear and free of air bubbles.
- Top up the fluid reservoir and reinstall the cap.
Caliper Alignment:
- Loosen the caliper mounting bolts to allow the caliper to move freely.
- Slowly squeeze the brake lever and observe the caliper’s positioning relative to the rotor.
- Center the caliper over the rotor and tighten the mounting bolts.
- Repeat the process until the caliper is properly aligned.
Consult your e-bike’s owner’s manual for any model-specific bleeding or alignment procedures, and consider having a professional service the brakes if you’re not comfortable with the process.
Servicing Mechanical Brakes
Mechanical brakes, also known as cable-actuated brakes, are a more straightforward option that may be easier for some riders to maintain:
Tools Needed:
- Cable cutters
- Brake pad removal tool
- Wrenches or pliers for adjusting the cable tension
- Isopropyl alcohol and clean rags
Brake Pad Replacement:
- Locate the brake pads within the caliper and note their orientation.
- Use the brake pad removal tool to gently pry the pads out of the caliper.
- Clean the caliper body and inspect the rim surface for any contamination or damage.
- Insert the new pads, ensuring they are installed in the correct orientation.
- Adjust the pad position so they make full contact with the rim.
Cable Tension Adjustment:
- Loosen the cable anchor bolt to release the brake cable tension.
- Squeeze the brake lever and observe the brake pads’ engagement with the rim.
- Adjust the cable tension using the barrel adjuster until the pads are making full, even contact with the rim.
- Tighten the cable anchor bolt to secure the adjusted cable tension.
Brake Alignment:
- Loosen the brake arm mounting bolts to allow the brake arms to move freely.
- Slowly squeeze the brake lever and observe the positioning of the brake pads relative to the rim.
- Adjust the brake arm position until the pads are centered and making full contact with the rim.
- Tighten the mounting bolts to secure the adjusted brake arm position.
Troubleshooting Tips:
- If the brakes feel spongy, check for air in the cable housing and tighten the cable tension.
- Squeaking or rubbing noises may indicate misaligned pads or a contaminated rim surface.
- Reduced braking power can be caused by worn pads, a stretched cable, or improper adjustment.
Familiarize yourself with your specific e-bike’s brake system by consulting the owner’s manual, and consider watching tutorial videos to see the maintenance process in action.
Routine Brake Maintenance Tips
To keep your e-bike’s brakes performing at their best, follow these regular maintenance tips:
- Inspect Brake Pads: Check pad thickness monthly and replace them when worn to the minimum level.
- Clean Brake Components: Wipe down the rotors, calipers, and pads with isopropyl alcohol to remove any contamination.
- Adjust Cable Tension: For mechanical brakes, check the cable tension and make minor adjustments as needed.
- Check Rotor Condition: Inspect disc rotors for warping, scoring, or contamination, and true or replace them as necessary.
- Bleed Hydraulic Systems: For hydraulic brakes, perform a full brake fluid bleed every 12-24 months, or as recommended by the manufacturer.
- Listen for Issues: Pay attention to any unusual noises coming from the brakes, as they can indicate a problem.
By following these proactive maintenance steps, you can help ensure your e-bike’s brakes remain in top condition and provide reliable, safe stopping power for years to come.

